

No backyard is complete without some sort of planter. If you wanted to buy one, a decent sized planter could easily run you $200-$300, so why not build one? Now if you decide to do this, I’m pretty sure you’ve checked online and found a lot of ideas ranging from stacked wood laid on the ground to modern concrete finishes. When designing a planter, your goal is actually quite simple – you need enough width and depth for your plants to grow, proper drainage and ensure your material is weather and bug resistant. Other than that, everything else is just cosmetic.
With this being my first attempt at a DIY planter, my objectives were simple – 1. Use scrap material from my deck tear down, 2. match our current outdoor colour palette, and 3. modern!
Caution: Before you begin, if you plan on planting edibles like herbs and vegetables, you have to factor in your wood choice. I used pressure treated wood simply because it met my first objective of using scrap material. Pressure treated wood is exactly that, treated with chemicals to withstand termites, weather and mould – which can be harmful to your health over time. Now, Home Depot’s website notes that their pressure treated wood is suitable for planters and will not cause you harm, but why risk it if you don’t have to? Another way to mitigate the risk is to insulate your planter with a plastic sheet, which I’ll do with this planter here. If you want to play it super safe, I’d recommend purchasing a natural weather resistant wood like Cedar or Redwood instead. Just be aware that this can start adding up in cost. The buildout is exactly the same.
Tools
- Mitre Saw
- Drill & Driver Set
- Level
- Kreg K5 Pocket Hole Jig
- Brad Nailer
- Staple Gun
- (Optional) Minimum 30″ Clamps
- (Optional) Paint brush and Roller
Materials
- Pressure Treated Wood (I used scraps)
- 2″ Exterior Screws
- Exterior Wood Glue
- Landscaping Fabric
- Plastic Liner
- (Optional) Black Exterior Paint
- (Optional) Exterior Polyurethane
Instructions


- Cut your lengths down to size. For me, I grabbed the best scraps I could find and cut them down to width. Since this really is customizable, you don’t have to follow my exact cuts, but I made my cut at 60″.

- (Optional) Pocket hole your top boards. One mistake I made was not consider how I was going to secure the top frame onto the base. I decided to use Pocket holes and had to punch the holes in on a finished base, which was a pain to do. If you have a pocket hole jig, you can take your top boards of the base and predrill the holes now. I put 2 on each width piece, and 4 on each length. If you don’t have a pocket hole jig, you can skip this step and just drill the top right down onto the frame vertically when you are ready.

- Cut braces and mount to sides. I used 2 initially, but came back later and added a third one down the middle for added strength. I wouldn’t go further than 30″ between inside braces. For my use, I put one on each side (see picture), and one down the 30″ point (middle). Use clamps to hold the pieces together square and secure the braces in with 2″ screws. Make sure the 2×2′ bracing doesn’t creep beyond the end of your cuts as this will leave a gap when you mount the side boards. I added the middle brace in step 12, but you can do it now.
Note: You want a tight fit when using pressure treated wood since it will shrink when dry and create a gap between the boards. Since I used 2×6″ boards, the height of the brace was approximately 22″. That being said, I recommend clamping them together and then taking a measurement for height since each board will vary in size!

- Using offcuts cut out 8 total pieces for the side walls. Again, highly customizable. I cut mine at 14″ wide to give enough room for roots to grow horizontally. Also, given the fact the box is 5 ft wide, I wanted the look to be modern slim, but also substantial at the same time.
- Mount the ends into the braces to complete the outside base. Check for level in every direction in case your floor isn’t flat. I used a large screwdriver to wedge each corner to the right height before securing the ends together. You can ignore the long 2×2″ I mounted on the inside for now. That was installed to help me move this around my yard by myself. More on that later.


- Make your legs. I cut my legs to 24″ height. Adjust your table saw to 45 degrees to create a mitre joint. Since the wood was 5 1/2″ wide and just a hair over 1″ thick, I set my fence distance at (5 1/2″ divided by 2 = 2 3/4″ – (1″ divided by 2) = 2 1/4″. That way by the time the 45 degree cut is completed, you’ll have 2 equal pieces (2 1/4″ inside width and 3 1/4″ outside width). If this cut is too challenging, you can rip a piece down the middle at 45 degrees, then set your blade back to 90 and rip the opposite side to create two equal pieces.
- Mount your legs. To attach the legs, I flipped the planter upside down and used the ground as the level point for the top of the legs. This ensures the frame top will sit flush with the top of the planter. Using outdoor wood glue and some brad nails, I positioned and nailed the legs for a clean mitred corner. This holds the legs in place while the glue cures. Given the weight of the unit and to re-enforce the legs, I added additional screws from the inside – 6 on each leg. Once done, run a screwdriver across the mitred joint to blend the two pieces together and soften up the edge.

- Paint your legs (Optional). Here’s another detour lol. The goal was not to paint this piece at all, otherwise I would have painted the legs before mounting them. But of course my wife wanted black, so here we are. With any type of DIY, you always roll with the punches. I lugged the planter back into the garage, taped it and rolled on some black exterior paint.

- Build the top frame. For the top frame, I took some cutoffs and played with the look until I found the right nosing depth. I wanted a slight overhang over the ends as (in my opinion) the ledger looks more sophisticated. It also opens up more interior space for actual planting. I ripped each board down to 4″ to cover the interior bracing/structure heads. The length and width of each of your pieces will vary based on the size of your planter. For context, my length had a 1/2″ overhang on each end and was approximately 61″ wide. The width had a 1″ overhang on each side, so the cut was approximately 16″.
As you explore the look that works for you, the most important part here is that your widths are exactly the same size, your lengths are exactly the same size and all your corner cuts are exactly 45 degrees. If you do this, you’ll be in good shape to “square” the frame. A tip is to stack the width boards and length boards together and make one cut for each set.

- (Optional) Rout edges. If you want to use a router to clean up the inside edges, do that before piecing the frame together. I was too excited to complete the look, I did this after. The main difference here is that if you rout the piece before putting it together you’ll end up with a square corner vs the round corner I have in the picture above. If you don’t have a router, you can simply use some sandpaper and soften the edges by hand.


- Mount the frame. To keep the screws hidden, I again pocket holed all the corners together, with 2 screws each. Using wood glue on each corner, I then screwed all the boards into place with exterior Kreg screws. If you don’t have a pocket hole jig, you can use a metal L brace attached to the underside, or just screw the frame right onto the base one piece at a time.

- Inside bracing. Remember step 3 where I said I added some bracing? This is the point I realized I needed more. The structure may be sound right now, but once you fill it with soil, it can get quite heavy and you don’t want the sides to bulge or warp.

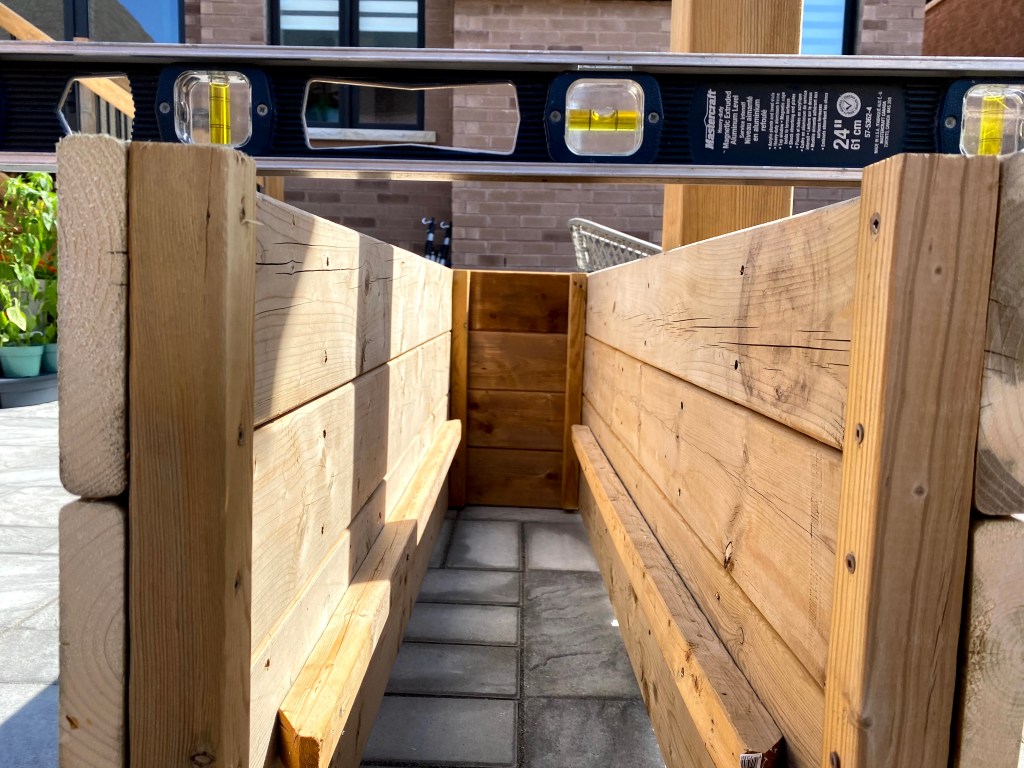
- Build your ledger. Taking more scraps, I cut 4 pieces to size that will act as ledges for the platform inside your planter. Drill them into your planter at a slight slope to promote drainage. I sloped mine towards the middle brace. I mounted them 13″ from the top, providing ample room for the plants to grow.

- Secure your planter floor. Again taking off cuts, I cut as many pieces as I could fit and laid them on top of the ledger. I spread them out with approximately 1/2″ gaps to provide drainage slots. I secured them down onto the ledger with exterior screws.

- Secure your frame to the base. I used the aforementioned pocket holes and secured it from the bottom up to hide the screws from sight. Again if you don’t have this, you can use brackets or just screw down from the frame onto the base. The core of the planter is now complete!
(Optional) Top coat. While waiting for the fabrics to be delivered, I decided to apply some exterior water based lacquer over everything. This is absolutely not necessary since the wood is pressure treated and water resistant anyways, but I like the gloss look and have a tub that I need to use. I did 4 coats, one every 3-4 hours, followed by a light sand.
Plant Prep
- Landscaping Fabric. The photos will take a break here as Autumn has set in and I don’t want to wrap the planter before winter. I will come back and edit the photos in early Spring as to add some visuals. For those who can enjoy sunny weather year round, this step is super easy. Landscaping fabric isn’t actually a required step for this project since the planter is raised off the ground. The purpose of the fabric itself is to prevent weeds from growing through, acting like a partition between the ground and your garden. The purpose of it in this use case is to prevent your soil from falling through the drainage holes since the fabric itself is perforated. Think of a lettuce or vegetable washing bowl. To lay it down, simply cut out the fabric a few inches larger than your base and then use a staple gun to bind it to the interior walls of the planter. It doesn’t have to look pretty, as it won’t be seen!
- Laying Plastic Wrap. Some DIY planters skip step 16 all together, and just wrap everything with plastic. In my case I used both. If you are using pressure treated wood, I highly recommend to wrap the plastic inside to create a protective barrier between your soil and the wood. This includes side walls, base and any other contact points with the wood. This will prevent the soil from running out of each seem, prolong the life of your wood and finally, keep your plants away from the chemicals! Remember to make sure you cut ample drainage holes near the base to allow water to run off.
And that’s it! I hope you enjoyed this project. I love how it brings a new element to our backyard. I will draw up some new ideas over the Winter to further elevate future designs and of course, I’ll be back in Spring to add the fabric photos.


Leave a comment